fmt=#recentblog

include the first five blog entries and an edit link

[[#recentblog]]
(:template defaults order=-ctime list=blog count=3:)
(:template each:)
(:if equal {=$:Note} 1:)
(:div0 class=blognote:)(:if !equal {=$:Note} 1:)
(:div0 class=blogpost:)
(:if auth edit:)%post-edit-link%[[http://jonhaupt.net/images/icons/edit.png -> {=$FullName}?action=edit]]%%(:if !equal {=$:Note} 1:)%post-title%[[{=$PageUrl}("Permanent Link: {=$Titlespaced}")|{=$Titlespaced}]]%%\\
%post-comment-link%(:if expr !equal {=$:Note} 1 && exists PostComments.{=$Group}-{=$Name}:)[[{=$FullName}#comments| Show Comments]] ({PostComments.{=$Group}-{=$Name}$FoxPostCount})(:if expr !equal {=$:Note} 1 && !exists PostComments.{=$Group}-{=$Name}:)[[{=$FullName}?action=set#commentbox| Add Comment]](:if !equal {=$:Note} 1:)%post-date%{=$BlogDate}%%, %post-time%{=$BlogTimeOfDay}%%(:ifend:)
(:div1 class=post-content:)
(:include {=$FullName}##more:)
(:div1end:)
(:if !equal {=$:Note} 1:)
(:div1 class=post-categories:)
Posted in (:listcategories comma {=$FullName}:)
(:div1end:)
(:if false:) -- took out social bookmarks thing --
(:div1 class='social-bookmarks':)
|| text-align=right
||[[http://del.icio.us/post?v=4&url=(:urlencode {=$PageUrl}:)&title=(:urlencode {$WikiTitle}:)+:+(:urlencode {=$Titlespaced}:) | Attach:Site/delicious.png"Save to del.icio.us"]]||
(:div1end:)
(:ifend:)
(:ifend:)
(:div0end:)
[[<<]]
[[#recentblogend]]
(:pagelist fmt=#recentblog $:Blog=1:)

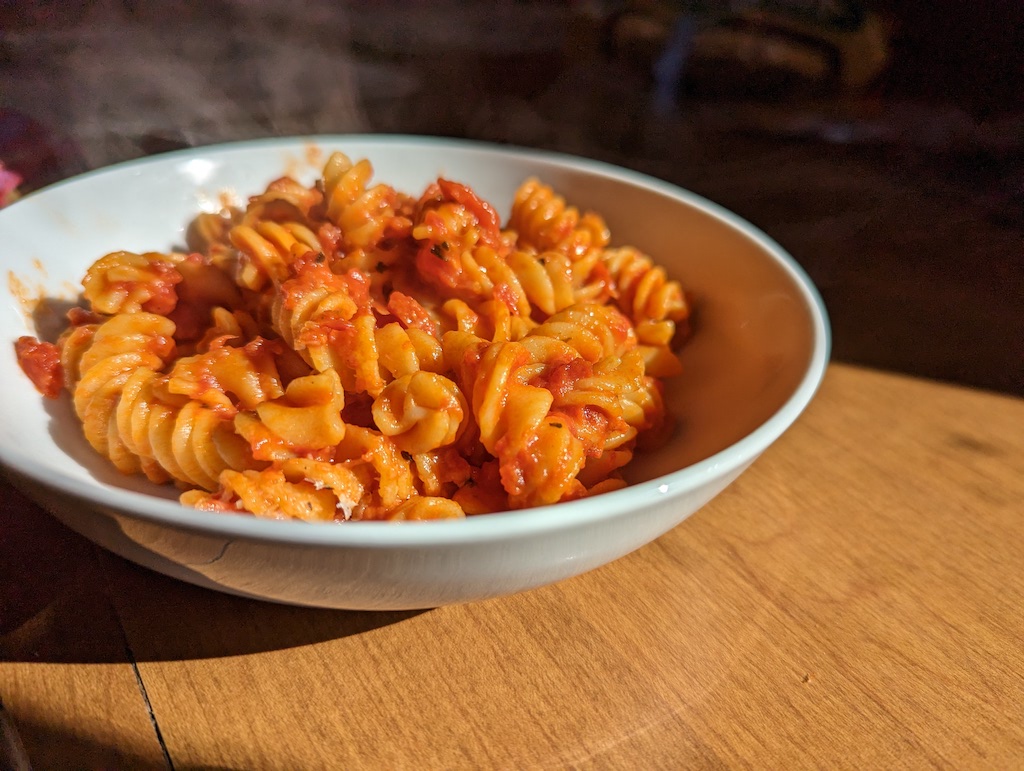
Fusilli with Red Sauce
Add Comment, Afternoon

Fusilli

It's been a while since I posted anything so I thought I should change it up. I'm not feeling super inspired so here is a basic explanation of how to do some simple sauce. You probably already know all of this, but who knows? Maybe this will help someone. I would 100% encourage you to try reading cookbooks by very good Italian chefs such as Marcella Hazan if you want to make really authentic pasta sauces well. This one is kind of made-up of various other recipes and methods I have used.

Fusilli with Red Sauce

28oz can whole tomatoes such as Bianco DiNapoli
1/2 yellow onion, not chopped, outer skin removed
5 tbsp unsalted butter, cut into pieces
A little chopped basil (fresh or dried, whatever)
Salt and pepper
2 tbsp tomato paste
2 tbsp heavy cream (optional)

Heat the tomatoes, 1/2 onion, and butter into an enameled cast iron pot or other heavy-bottomed pan on medium. Cook until the tomatoes cook down, stirring occasionally to mix in the butter and turn the onion around. You can mash the tomatoes with a potato masher now and then, helping to smash and crush them down. Eventually, they just break down and form a sauce. If I have more time, I like to let it simmer for quite a while (up to an hour) but sometimes I am in a hurry so I just do it quickly on medium and it only takes maybe 15–20 minutes to make a pretty good, bright-looking sauce.

1 pound fusilli or other pasta shape as you see fit

Meanwhile, start a pot of salted boiling water and make the pasta as explained on the package, or if you're making it from fresh pasta, follow whatever directions you or your recipe suggest.

Back to the sauce. At some point I like to throw in a little basil and definitely season with salt and pepper to taste.

If the pasta is done early, just put it in a bowl with a little
pat of butter and mix in order to keep it from sticking to itself.

Once the sauce seems ready, I usually throw in a little tomato paste for texture and in order to give the sauce a nice tomato-y flavor. At this point, I also decide if I'm in the mood to add a little cream or not. I think the slightly higher fat helps the sauce attach itself to the pasta, so I like to add a little bit. After mixing that in, I let the sauce simmer another minute and then remove from heat. Season to taste again. Combine with the pasta and serve.
Posted in , ,


Pressure Cooker Chile Colorado
Add Comment, It was getting late

Chile Colorado

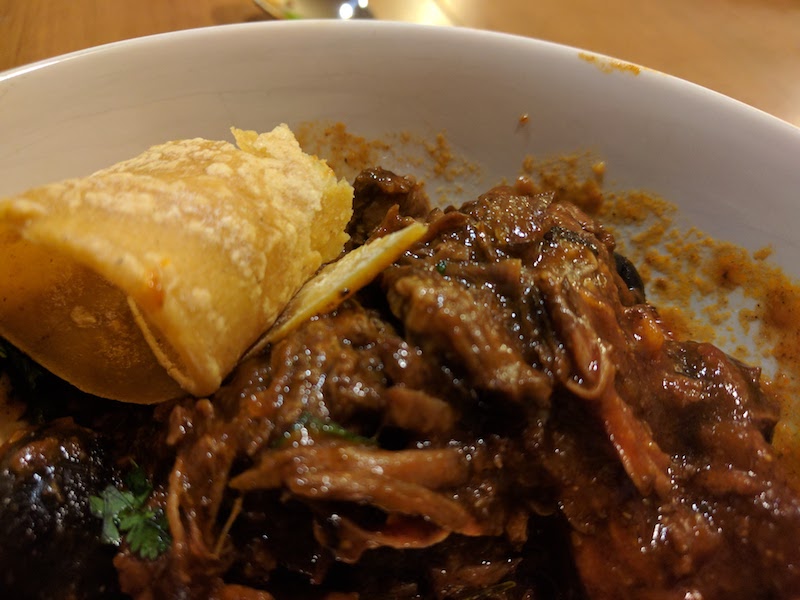
We've been playing a bit with the cooking in the Ranchos of Alta California. We were excited to try this Chile Colorado, but, honestly, we started too late... and we didn't want to eat at 9 p.m. So... we adjusted the recipe for use with a pressure cooker.

We used our stovetop pressure cooker because the amount of broth seemed pretty high. I think it would've worked in the electric pressure cooker, though. As usual, you'd have to adjust the cooking time for the electric pressure cooker.

The recipe works quite nicely in the pressure cooker. The meat is succulent and flavorful.

Chile Colorado

Adapted from California Rancho Cooking by Jacqueline Higuera McMahan.
Serves 6–8 with other dishes

Red Chile Sauce

18 dried chiles (California and/or New Mexico)
2 ancho chiles
3 cloves garlic
2 1/2 cups water

Rinse the chiles under cold water. Cut off the stems, cut in half. Shake out the seeds onto a paper towel. Place the chiles and garlic in the top half of a steamer over simmering water. Steam for 25 minutes.

Remove the chiles and garlic from heat. In three batches, place in a blender with 1/2 cup water and purée until smooth. Pour the puree into a wire strainer over a bowl. Push all the chile purée through the strainer. Scrape the strained purée off the bottom of the strainer into the bowl. Run the blender with a little bit of water to clean the blades and pour that through the strainer as well to make sure you get all the awesome chile. You should have about 3 1/2 cups of purée.

3 tbsp. olive oil
3 tbsp. flour
1 1/2 tsp. dried oregano
1 tbsp. apple cider vinegar
1 tsp. salt
Pinch of sugar (optional)
1/2 to 1 c. water (if you need it)

Heat the olive oil in a deep skillet over medium heat. Add the flour, toasting lightly until nut brown. Whisk in the chile purée. Add the oregano, vinegar, and salt. Simmer for 20 minutes. Taste the sauce—add a pinch of sugar if the flavor seems too sharp. If the sauce seems too thick, add water or broth and simmer again for 5 minutes. Use immediately or store: 5 days in the refrigerator or frozen for 6 months.

Chile Colorado

3 1/2 pounds beef roast, chuck, etc.
1 tbsp. vegetable oil

Cut the meat into 1- to 2-inch chunks and dry well with paper towels. Heat the oil in the pressure cooker pot over medium heat, and brown the meat on all sides in small batches. Remove the meat chunks as they brown and set on a plate.

2 medium onions, chopped
1 tbsp. garlic, minced
2 tsp. salt
4 c. beef stock

After the meat is done, add the onions to the pressure cooker pot, adding a little oil if necessary. Sauté until soft and golden, 10 minutes. Meanwhile, mix the garlic and salt together. When the onions are done, stir in the garlic and salt. Add the browned meat, any juices from the plate, and the beef stock. Secure the pressure cooker lid. Bring to high pressure and cook for 15 minutes at high pressure, then use natural release for 15 minutes. Quick release any remaining pressure after the timer is up.

2 c. Red chile sauce (above)
1 tbsp. cumin seeds, toasted and crushed
1 tbsp. dried oregano
1 to 2 tbsp. New Mexican chile powder (optional)

Drain off all but 1 cup of broth from the pot and reserve for another dish. Leaving the meat and 1 cup broth in the pot, add Red chile sauce, cumin, oregano, and chile powder (if you're using it). Secure the lid again and return the pressure cooker to high pressure, cooking again for 10 minutes. Use the natural release again for 15 minutes, then quick release any remaining pressure.

3 tbsp. masa harina flour
1/4 c. water
1 c. black olives (for garnish)
1/4 c. minced cilantro (for garnish)
Tortillas

Blend the masa harina into the water and blend into the stew to thicken it. Simmer for 5 minutes. Warm the tortillas on a dry skillet. Serve Chile Colorado in bowls with olives and cilantro to add as well as the tortillas for dunking.

Posted in ,


Vegan Citrus Tart
Add Comment, It was getting late

Vegan Citrus Tart

I may be an omnivore and generally try to eat a little of everything, but everything includes food that my friends, family, and co-workers eat—so when my awesome dairy-free co-worker was having a birthday, it was time to deliver. So then... I didn't want to stop at the dairy-free part. She also tries to avoid wheat and avoids refined sugars, including cane sugar. I do love a challenge!

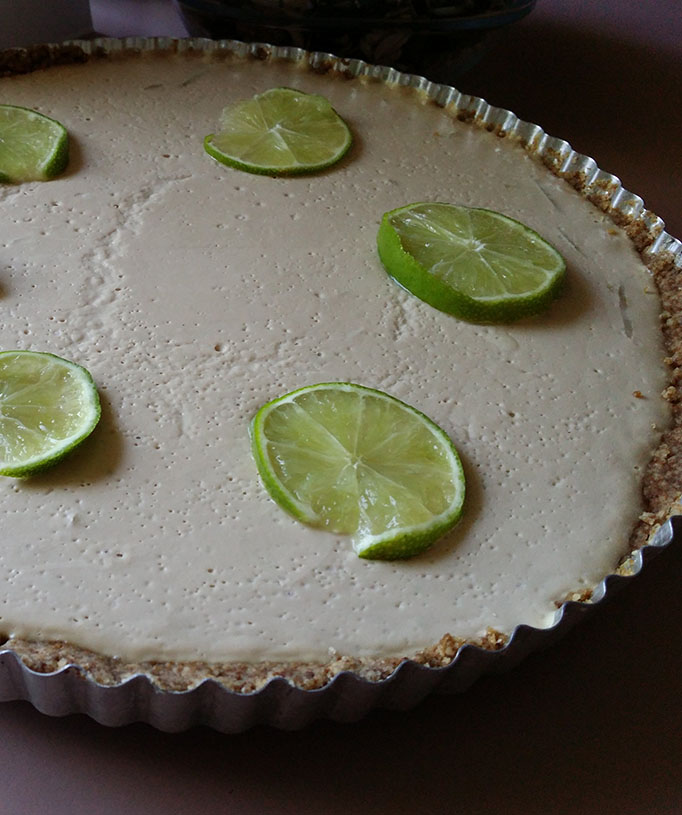
I do not like to use soy or avocado in a key lime pie or tart recipe—to me, those seem a bit like cheating and don't appeal to me. I love avocados, but not in a key lime tart! Luckily, Isa Chandra Moskowitz has published this recipe for key lime pie using agar agar for the thickener. This is a great recipe and the filling produced is quite tasty. With the coconut sugar, the whole tart ends up looking a bit brown, but it's delicious brown food. :)

For the crust, I altered a go-to gluten free tart crust recipe from a baker I trust for such things. I only needed to trade out the butter and sugar—both fairly straightforward; the vegan shortening and coconut sugar are 1:1 substitutes.

The result is this yummy, gluten-free, dairy-free, alternative-sugar key lime tart. I hope the recipe is helpful for others!

Vegan Citrus Tart

Adapted from The Post Punk Kitchen and Saporific

Crust

1 cup brown rice flour mix (I use this mix)
1/4 cup coconut sugar
1 tsp xanthan gum
5 tbsp cold vegan shortening, cut into little cubes
1 tsp vanilla extract

  1. Preheat the oven to 350 degrees. Grease a 9-inch tart or pie pan with cooking spray, and dust with rice flour.
  2. In a food processor or mixer, combine flour, sugar, and xanthan gum. Add vegan shortening and pulse or mix on low speed until the texture is crumb-like. Add the vanilla and mix well.
  3. Press the mixture into the bottom and up the sides of the prepared pan.
  4. Bake on center oven rack for 18 minutes or until golden brown. Cool on rack in pan. (Remove sides only after completely cooled.)

Filling

1 tbsp lime zest
2/3 cup fresh lime juice
1 1/2 cups unsweetened almond milk, at room temperature
2 tbsp agar flakes (or 2 tsp agar powder and skip the soaking step)
16 oz coconut milk at room temperature
2 tbsp tapioca flour
1/2 cup coconut sugar
1 tsp vanilla

  1. In a small saucepan, soak the agar in almond milk for about 15 minutes. Bake your pie crust for 8 to 10 minutes; remove from oven to cool.
  2. While the agar is soaking, mix together coconut milk, tapioca, sugar and vanilla. It’s really important that your coconut milk is at room temperature so that it doesn’t affect the agar when you add it to the pot.
  3. After soaking agar, turn up the heat and bring almond milk to a boil. Keep a close eye so that it doesn’t boil over. Immediately reduce heat and let simmer for about 15 minutes, until agar is dissolved. (If using powdered, it will only take about 5 minutes to dissolve.)
  4. Once dissolved, very slowly whisk in the coconut mixture and then the lime juice and zest. Adding it too fast will make the agar gel up, which you don’t want it to do just yet. Once added, whisk often for about 10 minutes, until mixture has thickened. If it isn’t thickening, turn the heat up just a bit, but be careful not to boil.
  5. Pour mixture into pie shell and let cool on the counter for about half an hour, just so that it isn’t steaming. Refrigerate for at least 3 hours, until fully set. Garnish with lime slices.

Posted in ,


fmt=#blogdate

pagelist by blogdate

[[#blogdate]]
(:template defaults order=-ctime list=blog:)
(:template first:)
>>blogdatelist<<
(:template first {=$BlogDate2}:)%sidehead%{=$BlogDate}
(:template each:)
* {=$BlogTimeOfDay}: [[{=$FullName}|{=$Titlespaced}]]
(:template last:)
>><<
[[#blogdateend]]
(:pagelist fmt=#blogdate $:Blog=1:)

06 February 2023

13 February 2017

13 August 2015

26 May 2014

29 September 2011

08 May 2011

02 January 2010

29 April 2009

25 November 2008

01 August 2008

21 May 2008

19 May 2008

10 May 2008

09 April 2008

06 March 2008

17 February 2008

03 January 2008

29 December 2007

24 December 2007

21 December 2007

30 November 2007

23 November 2007

22 November 2007

22 October 2007

15 October 2007

01 October 2007

20 September 2007

04 September 2007

28 August 2007

12 May 2007

15 April 2007

23 February 2007

17 February 2007

03 February 2007

11 November 2006

28 October 2006

16 July 2006

07 July 2006

06 July 2006

  • Around lunch time: Cars

05 July 2006

02 June 2006

27 February 2006

  • It was getting late: Quilt
  • It was getting late: Blocks

25 February 2006

19 February 2006

18 February 2006

19 December 2005

10 December 2005

02 October 2005

20 June 2005

08 March 2005

  • Sometime after breakfast: Blink

16 September 2004

11 September 2004

07 September 2004

28 August 2004

27 August 2004


fmt=#blogarchive

pagelist by blogdate and only list pages with the same creation month as the name of the page i.e. 2006-02

[[#blogarchive]]
(:if equal {=$BlogMonth2} {*$Name}:)
(:template first:)
>>blogdatelist<<
(:template first {=$BlogDate2}:)%sidehead%{=$BlogDate}
(:template each:)
* {=$BlogTimeOfDay}: [[{=$FullName}|{=$Titlespaced}]]
(:template last:)
>><<
(:ifend:)
[[#blogarchiveend]]

This one won't work unless the page you are using is something like 2006-02. But then you would use (:pagelist fmt=#blogarchive order=-ctime $:Blog=1:)


fmt=#monthlist

pagelist of blog month archive links

[[#monthlist]]
(:template first {=$BlogMonth2}:)
* [[BlogArchive.{=$BlogMonth2}?action=browse|{=$BlogMonth3}]]
[[#monthlistend]]
(:pagelist $:Blog=1 fmt=#monthlist order=-ctime list=blog:)

fmt=#socialbookmarklist

pagelist used to add social bookmark list

[[#socialbookmarklist]]
>>socialbookmarks center<<
* [[http://del.icio.us/post?v=4&url={=$PageUrl}&title={$WikiTitlePlussed}+:+{=$Titleplussed} | Attach:Site/delicious.png"Save to del.icio.us"]]
>><<
[[#socialbookmarklistend]]

fmt=#previousposts

pagelist by blogdate, just dates and titles

[[#previousposts]]
(:template defaults order=-ctime list=blog count=5:)
(:template first:)
>>previous-posts<<
(:template each:)
*[[{=$FullName}|{=$Titlespaced}\\
%pdate%{=$BlogDate}%%]]
(:template last:)
>><<
[[#previouspostsend]]
(:pagelist $:Blog=1 fmt=#previousposts:)

[[#currentpost]]
(:template defaults order=-ctime list=blog count=1:)
(:template each:)
(:div0 class=blogpost:)
(:if auth edit:)%post-edit-link%[[http://jonhaupt.net/images/icons/edit.png -> {=$FullName}?action=edit]]%%(:if:)%post-title%[[{=$PageUrl}("Permanent Link: {=$Titlespaced}")|{=$Titlespaced}]]%%\\
%post-comment-link%(:if exists PostComments.{=$Group}-{=$Name}:)[[{=$FullName}#comments| Show Comments]] ({PostComments.{=$Group}-{=$Name}$FoxPostCount})(:if !exists PostComments.{=$Group}-{=$Name}:)[[{=$FullName}?action=set#commentbox| Add Comment]](:if:)%post-date%{=$BlogDate}%%, %post-time%{=$BlogTimeOfDay}%%
(:div1 class=post-content:)
(:include {=$FullName}##more:)
(:div1end:)
(:div1 class=post-categories:)
Posted in (:listcategories comma {=$FullName}:)
(:div1end:)
(:if false:) -- took out this social bookmarks thing --
(:div1 class='social-bookmarks':)
|| text-align=right
||[[http://del.icio.us/post?v=4&url=(:urlencode {=$PageUrl}:)&title=(:urlencode {$WikiTitle}:)+:+(:urlencode {=$Titlespaced}:) | Attach:Site/delicious.png"Save to del.icio.us"]]||
(:div1end:)
(:ifend:)
(:div0end:)
[[#currentpostend]]
(:pagelist fmt=#currentpost $:Blog=1:)

Fusilli with Red Sauce
Add Comment, Afternoon

Fusilli

It's been a while since I posted anything so I thought I should change it up. I'm not feeling super inspired so here is a basic explanation of how to do some simple sauce. You probably already know all of this, but who knows? Maybe this will help someone. I would 100% encourage you to try reading cookbooks by very good Italian chefs such as Marcella Hazan if you want to make really authentic pasta sauces well. This one is kind of made-up of various other recipes and methods I have used.

Fusilli with Red Sauce

28oz can whole tomatoes such as Bianco DiNapoli
1/2 yellow onion, not chopped, outer skin removed
5 tbsp unsalted butter, cut into pieces
A little chopped basil (fresh or dried, whatever)
Salt and pepper
2 tbsp tomato paste
2 tbsp heavy cream (optional)

Heat the tomatoes, 1/2 onion, and butter into an enameled cast iron pot or other heavy-bottomed pan on medium. Cook until the tomatoes cook down, stirring occasionally to mix in the butter and turn the onion around. You can mash the tomatoes with a potato masher now and then, helping to smash and crush them down. Eventually, they just break down and form a sauce. If I have more time, I like to let it simmer for quite a while (up to an hour) but sometimes I am in a hurry so I just do it quickly on medium and it only takes maybe 15–20 minutes to make a pretty good, bright-looking sauce.

1 pound fusilli or other pasta shape as you see fit

Meanwhile, start a pot of salted boiling water and make the pasta as explained on the package, or if you're making it from fresh pasta, follow whatever directions you or your recipe suggest.

Back to the sauce. At some point I like to throw in a little basil and definitely season with salt and pepper to taste.

If the pasta is done early, just put it in a bowl with a little
pat of butter and mix in order to keep it from sticking to itself.

Once the sauce seems ready, I usually throw in a little tomato paste for texture and in order to give the sauce a nice tomato-y flavor. At this point, I also decide if I'm in the mood to add a little cream or not. I think the slightly higher fat helps the sauce attach itself to the pasta, so I like to add a little bit. After mixing that in, I let the sauce simmer another minute and then remove from heat. Season to taste again. Combine with the pasta and serve.

Posted in , ,

Creative Commons License

Welcome to JonHaupt.net; it's my blog, as you might have gathered. I write about food, photos, and other things.

The blog looks best using Chrome, Firefox, Safari, or WebKit. If you use IE or something, and it doesn't look as good, sorry.

JonHaupt.net is powered by PmWiki.